Initial setup of CodeBlocks
These instructions should help you get CodeBlocks setup on your computer where you can follow along with the tutorials in this series. It is written from the perspective of a user who has never used CodeBlocks and perhaps never even used a compiler or IDE in general before.
-
Download the latest version from the Downloads section of the CodeBlocks website.
As of this writing (Dec. 2019) the latest version is 17.12. Be sure to select the codeblocks-17.12mingw-setup.exe file, as this includes the GCC/G++ compiler and GDB debugger.
-
Go into your downloads folder and double click on the codeblocks-17.12mingw-setup.exe you just downloaded to start the installation process.
-
Depending on your setup, Windows UAC may prompt you if you want to allow this app to make changes to your computer, select Yes.

-
Click on Next in Welcome to CodeBlocks setup window to continue.

-
Click I Agree, if you agree to the License Agreement (note that you cannot install or use the program if you do not agree).

-
Select Full (everything selected) in the drop-down inside the Choose Components window.

-
Select Install in the Choose Install Location window. Note that you can choose a different path here if you wish. By default CodeBlocks uses: C:\Program Files (x86)\CodeBlocks

-
Follow any remaining prompts until installation is complete.

-
You should now have a CodeBlocks shortcut icon in your start menu and/or on your desktop.

-
Create a folder to hold your projects, I like to create a new folder right off of my C:\ (or other) drive called something like C:\C++_Tutorials Note the underscore in the folder name. Sometimes spaces in folder or filenames can cause issues with CodeBlocks, or with other compilers that you may use. Try to avoid using space in your naming if possible, at least with your project folders and filenames.

-
Create your first Program. Double click on the CodeBlocks Icon to launch the program. Once the program has launched, go to File→New→Project to create a new project.

-
Select Console application from the list and click on Go.

-
In the Console application window verify C++ is selected, click on Next.

-
In the next window, give your project a name, i.e.: MyFirstProject.
Select the folder to create your project in, here you will choose the folder you created above, i.e.: *C:\C++_Tutorials*
Notice CodeBlocks displays the resulting path/filename at the bottom. Click on Next.

-
You can just accept the defaults at this point, and click on Finish.

-
After a second or two, your new project should appear. You will notice there is not much to see at first.
In the left panel you should see a Workspace with your project’s name (MyFirstProject). Underneath the project name you will see a “sources” folder icon. Double click on it (or click the little +) to expand this folder.
You should now see a file named main.cpp. Double click on it to open it for editing.
Now you should see the code contained within the main.cpp file. By default, CodeBlocks creates a simple Hello World template that we can actually compile and run to test our installation.
#include <iostream>

using namespace std;

int main()
{
   cout << "Hello world!" << endl;
   return 0;
}

-
You can go ahead and compile and run this code to check to see if your installation is working.
Toward the top of the CodeBlocks main window, you should see a series of tool icons. One of them looks like a little gear with a green triangle.
If you hover you mouse over it for a second, it should indicate that it is the “Build and run” function. Notice also there are separate versions of each of these functions just to the left of this icon. For now we want to use the combined “Build and run”, go ahead and click on the icon.

-
If all goes well, after a few moments a new console window should appear, with the text “Hello World!” at the very top. Congratulations, you have just compiled and ran your first C++ program and more importantly verified that your CodeBlocks installation is up and running.
Bonus Tips

-
Re-format Source Code: Right-click on the source file and click ‘Format this file (AStyle)’. To configure the formatting styles, go into Settings->Editor and pick Source Formatter in the left hand pane..
-
Auto-Complete: Type the initial letters of a keyword/identifier and press Ctrl-space to list the available options. This may already be on by default is CodeBlocks.
-
Abbreviation: e.g., Type ‘for’ and press control-J to get the skeleton of a for-loop. The abbreviation list can be configured in Settings->Editor and scroll down to the Abbreviations pane.
-
Zoom in/out in the code editor: Hold the control key down and zoom in/out via the mouse scroll wheel.
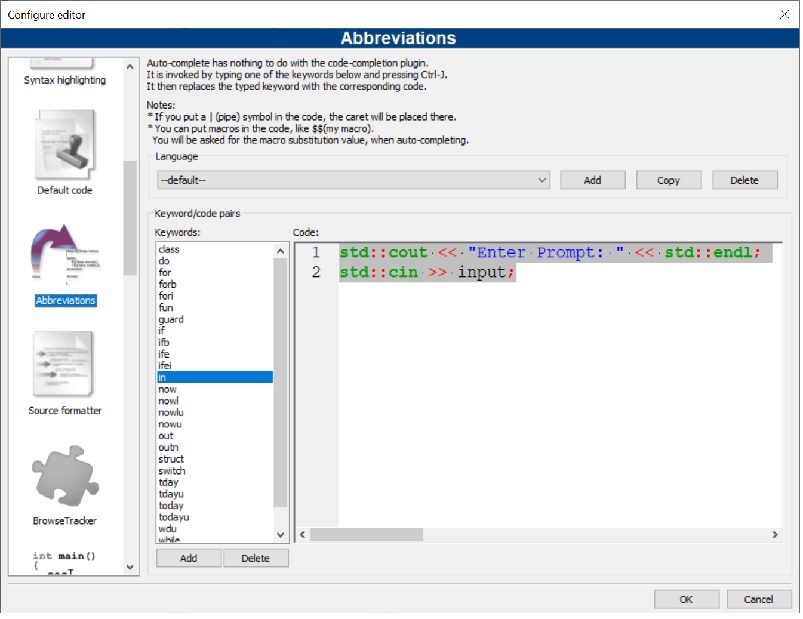
Abbreviations
Speaking of abbreviations, I usually add a few of my own to help speed up coding of things I either type a lot or have a complex setup, such as classes or functions.
Go into **Settings->Editor** and in the left side of the window that opens scroll down to the **Abbreviations** pane and click on it. In the right pane where you see all the default abbreviations, click on Add.
Give your abbreviation a short, but descriptive name. Then in the code section type the template code and click on Ok at the bottom right to save. Now in your editor window, type your abbreviation and hit **control-J** and the editor automatically adds your code template.
A couple of abbreviation examples that I use are as follows:
Name: out
Code:
std::cout << "text" << std::endl;
As you can see, once this new abbreviation is saved, by simply typing out and entering control-J I get the basic cout statement template ready to customize.
I also do an similar one named: outn with code:
std::cout << "text\n";
that I use for output where I might not need the endl.
For instance, say I simply wanted to print a statement std::cout «“Hello\n”;.
When using cin you normally want to prompt the user just before so they know what information you are expecting, like entering their name.
For this I make a abbreviation named: in and use the following code:
std::cout << "Enter Prompt: " << std::endl;
std::cin >> input;
<br
Now the next time you need a basic cin prompt, you can type your abbreviation’s name in, hit control-J and you simply change the prompt text and input variable name to suit your needs.
So hopefully you now can make your own abbreviations and customize the template to whatever works best for you. Do keep in mind though, I only use abbreviations for code I either type a lot, over and over, or code with more a complicated setup, such as classes and functions.
Also, consider how easy it is to type the code in manually, setting a variable for instance int a = 32;, is probably just as fast (or faster) then creating an abbreviation and having to change the variable’s name and value each time.