This is the companion page for the VirtualBox Windows 10 Video
The video and this guide will walk you through step-by-step of setting up a VirtualBox Virtual Machine on your computer and using it to install a fresh Windows 10 Virtual Machine installation.
This is a rather long and thorough guide, so I have included an index of the major topics:
Recommendations and Key Terms
Download Windows 10 ISO
Download and Install VirtualBox Software
Create a Virtual Machine
Configuring Virtual Machine for Windows Install
Installing Windows 10 on your Virtual Machine
Installing Guest Additions
Create a Shared Folder
Drag and Drop
Create an Initial Snapshot Image
Recommendations and Key Terms
Before we start, I want to quickly go over a few items:
To follow along with this guide you should have a HDD (SSD preferred) with at least 200 GB of free space, but more is better. Alternatively, you could use an external drive with a similar free space capacity, it will be a bit slower but still workable.
If you do not already have a Windows ISO image file, you will also need a high speed Internet connection as we will be downloading a ~4 GB Windows ISO image file. On a 100 Mbps connection it takes roughly 6 minutes for the download portion, so you can use that as a base reference (i.e. a 10 Mbps connection will take 60 minutes and so on).
Finally, if you wish to make your Windows 10 VM a more permanent installation, you will also need to have a valid Windows 10 Product key. This is optional as you can also take a snapshot of your finished VM install and simply revert back to its initial state once the grace period is over.
There are also a few terms I wish to clarify: VM, VB, host system and guest system.
-
VM is short for Virtual Machine, a general term describing a computer environment that is virtualized. The VM is the virtual “guest” system that will run on your host.
-
VB is short for the Oracle VirtualBox software we are using to create and run our VM (Virtual Machines).
-
The ‘host system’ is the physical PC you are probably using right now that you intend to install the VB software on to run the virtual guest machine.
-
The ‘guest system’ then is the Virtual Machine that you will be running using the VB software, in this case the virtual Windows 10 system we will be installing.
Download Windows 10 ISO
To begin we will need to get a Microsoft Windows 10 ISO image.
Go to the Windows 10 Download Tool page.
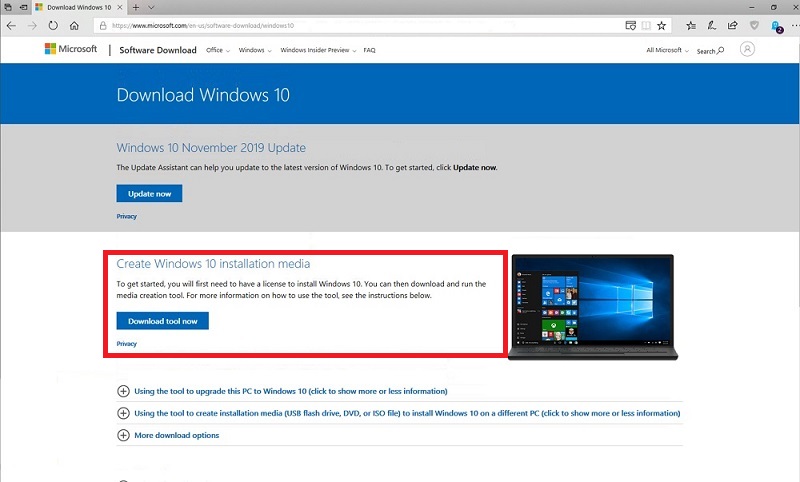
Under the Create Windows 10 installation media section, click on Download tool now.
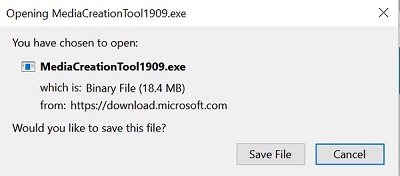
You should get a popup asking you to save the file, go ahead and click on Save File.
Once the file has downloaded, open up your downloads folder and double click on the MediaCreationToolxxxx.exe to begin installation of the tool.
Note the xxxx is the current version of Windows that the tool will download, and its value will change over time. As of this writing it is version 1909.
Click on Yes to allow the app to make changes to your system if Windows prompts you to do so.
A dialog will appear for a few moments as it set things up. After a little while the license agreement will appear.
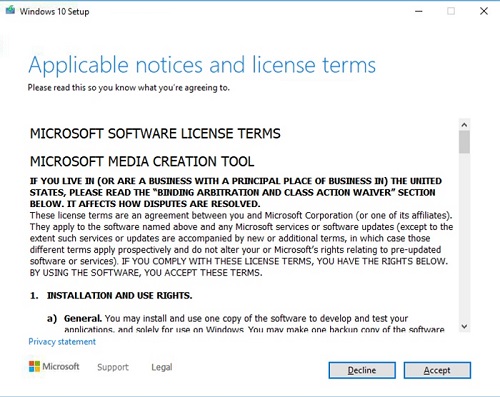
Click on Accept if you accept the terms of the agreement.
Again, you may get a brief pause as the tool sets a few more things up.
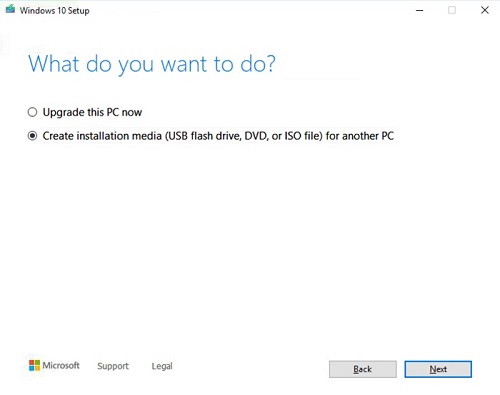
After a little pause, you will get a screen asking “What do you want to do?”
Here it is important that you choose the second option “Create installation media (USB flash drive, DVD, or ISO file) for another PC”.
Choosing the first option will attempt to upgrade your PC, but we only want the Windows 10 ISO image for our Virtual Machine.
Double check to make sure you chose the “Create installation media …” option and click on Next.
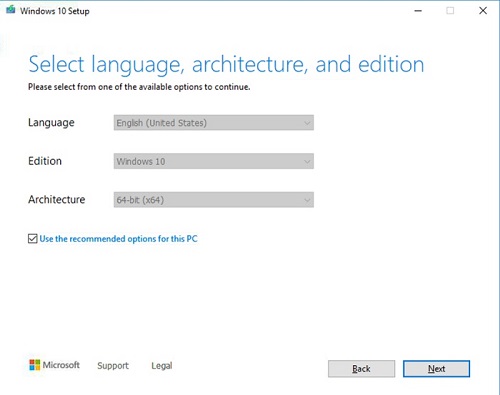
By default your Language, Edition and Architecture should be pre-selected. If you uncheck the “Use recommend settings options for this PC” checkbox you can adjust these values if you need to.
If everything looks ok, click on Next.
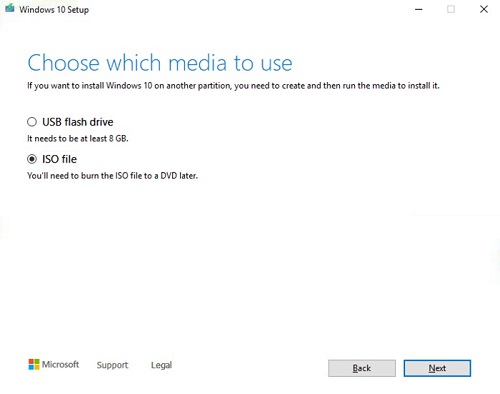
On the Choose which media to use select ISO file, as this will be the Windows disk image we will use for our VirtualBox installation.
Click on Next.
Choose a location to store the ISO image, ensuring that the location you choose has plenty of room. The ISO image is around 4.2 GB as of this writing. You can use the default name Windows.iso and click on Save.
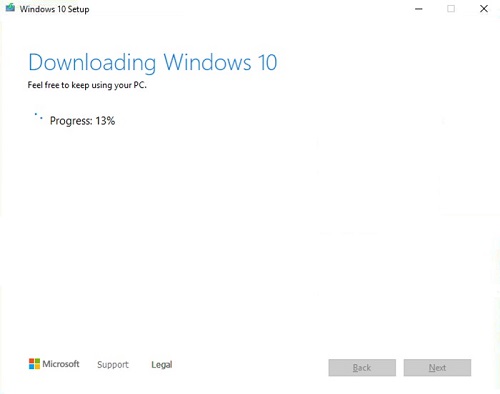
The image will begin the downloading process, depending on your Internet connection it may take some time. Once the image has been downloaded, the program will also need to convert it to an ISO. This whole process can take several minutes even with a fast connection and maybe an hour or more on a slow connection.
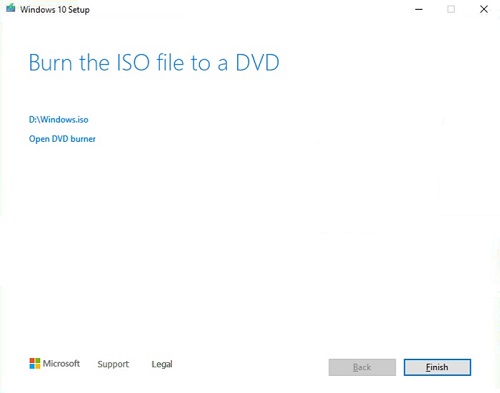
Once the download has completed you will see the Burn ISO file to DVD finish screen. Since we are just interested in the ISO image for our VB install, you just go ahead and click finish.
While you can burn the image to a DVD if you so choose, if you want a copy of Windows for re-imaging a physical machine, you would be better served running the tool again and choosing a USB image.
Download and Install VirtualBox Software
We will also need to download the VirtualBox software from Oracle.
Go to https://www.virtualbox.org/ and click on Download VirtualBox 6.1 (as of this writing) to go to the download page to begin downloading the Virtualbox software.
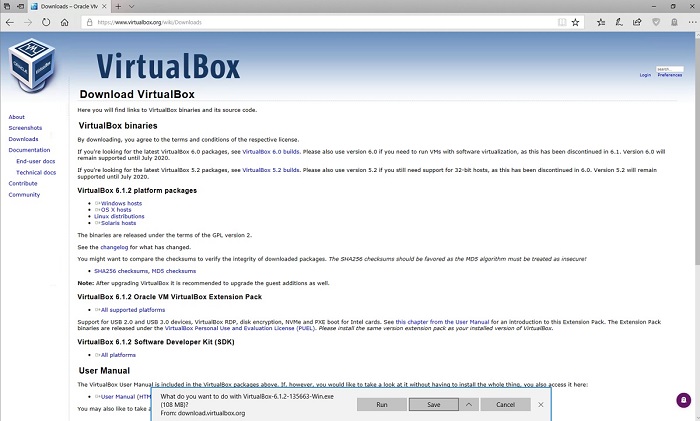
Select your host platform, in this example I am using Windows so we select Windows hosts.
A download dialog should appear prompting you to save the file, go ahead and save it to your downloads folder or wherever you typically download files.
Once the download has finished, open up your download folder and double click on the VirtualBox-xxx.exe file to begin the installation, where xxx is the current version number. As of this writing the file is: VirtualBox-6.1.2-135663-Win.exe
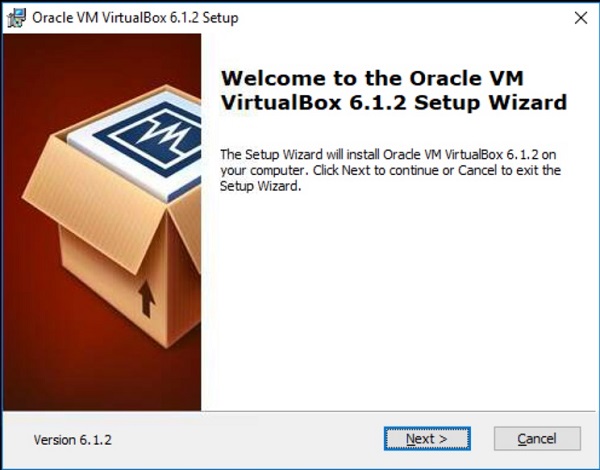
The Welcome to Setup Wizard Screen will appear.
Click on Next to continue.
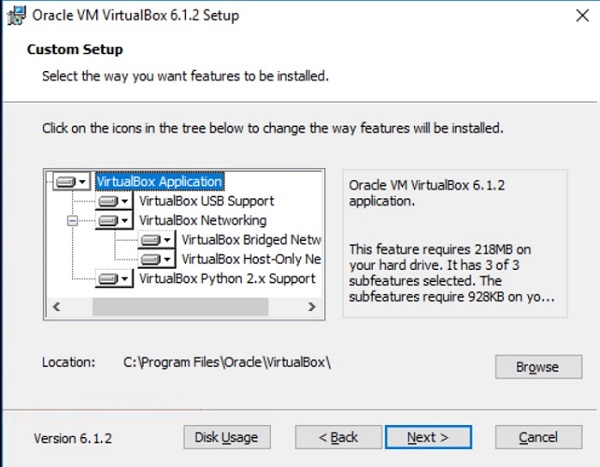
On the Custom Setup screen, you can leave the selected components checked. It does indicate that this will use 218 MB of space on your hard drive. You may want to install this in another directory if hard drive space is tight.
In my case, I created a new folder on my E Drive to install the program, named E:\VirtualBox. By default it uses the c:\Program Files\Oracle\VirtualBox\ directory.
Once you have your folder changed, or if you are using the default path, click on Next.
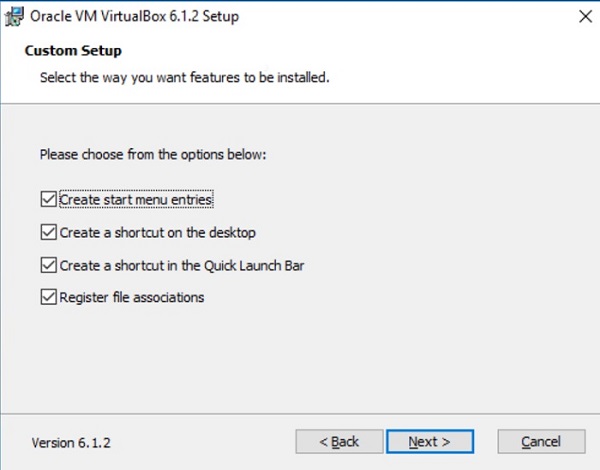
The next screen allows you to choose from the following options:
- Create a start menu entry
- Create a Desktop shortcut
- Create a shortcut in the Quick Launch bar
- Register file associations
Pick which ones you want to enable, but I would recommend enabling at least the last choice to associate file extensions.
Click on Next to continue.
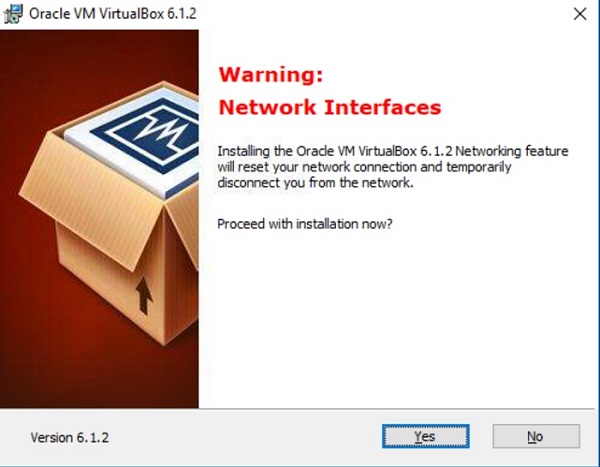
The next screen warns you that by continuing your network may momentarily drop as VirtualBox configures its virtual network settings.
This only takes a second so you will hardly notice unless you are using a wireless connection.
Click on Yes to continue.
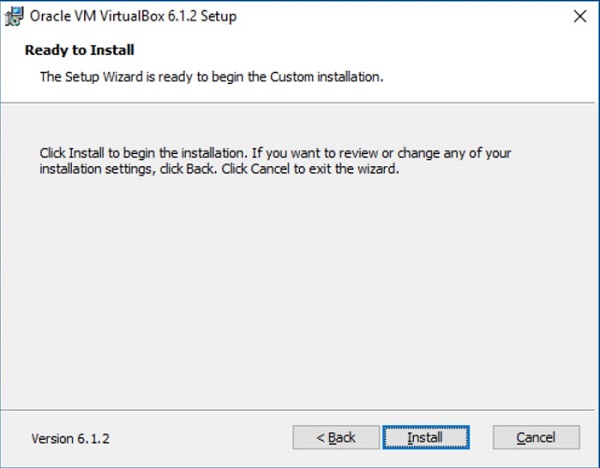
You will then be presented with a Ready to Install screen informing you the wizard is about to start the custom installation. Now is the time to make any changes by using the “Back” button if you need.
Click on Install to continue.
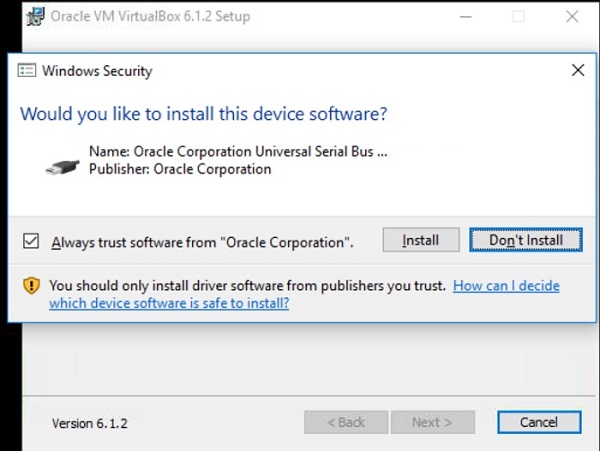
You may get one or more install device driver prompts during installation.
I usually just check the trust software from Oracle box and click on Install to avoid further prompts.
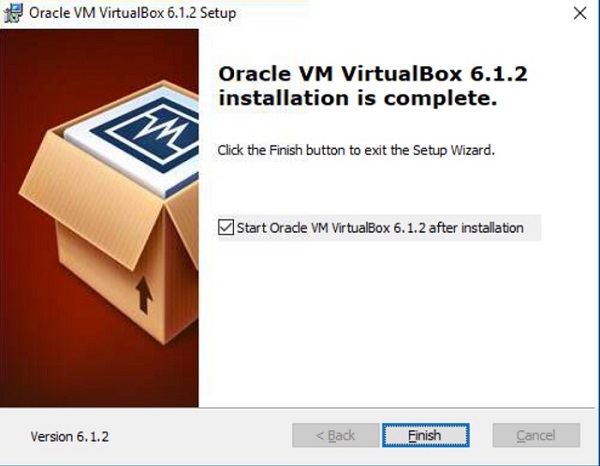
Once the setup process has completed, you will see a new window like above.
It has the option to Launch the Oracle VM VirtualBox after installation checked by default. You can go ahead and leave it checked to continue on with the guide.
Click on Finish.
Create a Virtual Machine
If you are following along in the guide step by step and you left the box checked in the previous step you should already have the screen shown below on your PC. If not, or if you unchecked the box, find the VirtualBox icon or executable and launch the program at this time.
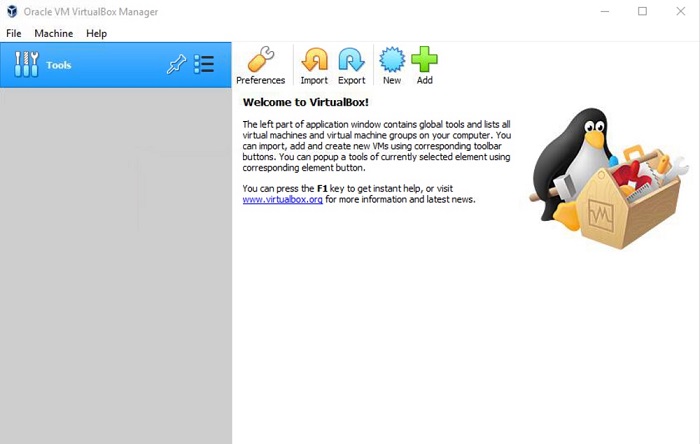
From the Welcome to VirtualBox screen, click on New.
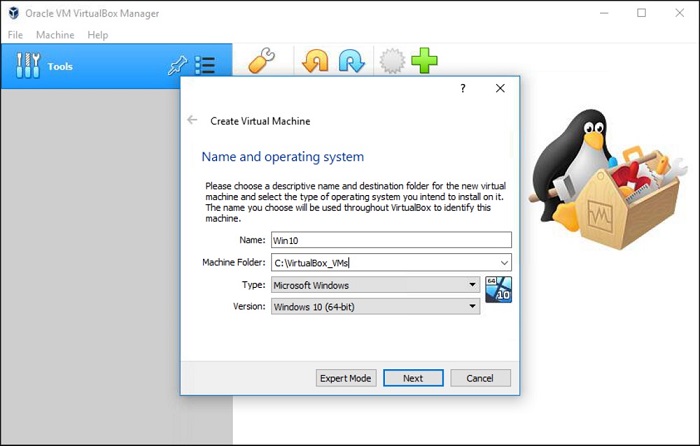
Give your VM a name, such as Win10.
Choose the installation folder, I chose a folder right off my C: drive named VirtualBox_VMs.
Choose Version, in this case Windows 10 (64-bit).
Click Next.
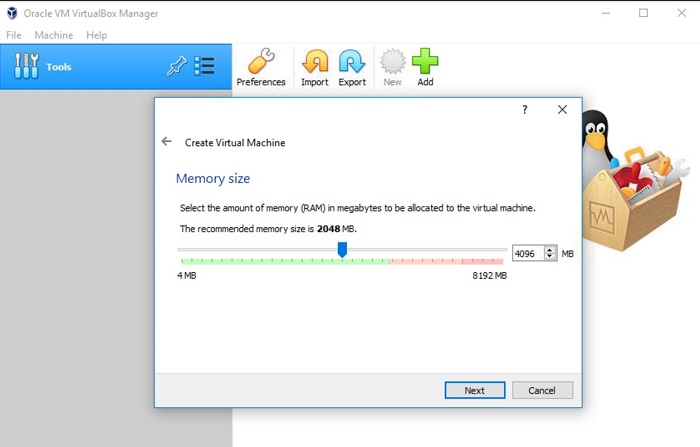
Set the memory size. I chose 4 GB in this example.
Choose no more than ½ of your actual physical RAM to prevent having issues on your host system. I found that 4-8 GB seems to be the sweet spot and works well in most cases.
You can get by with as little as 2 GB, but depending on what applications you are planning on running it can get a bit sluggish with too little RAM.
Once you have the memory size set, Click Next.
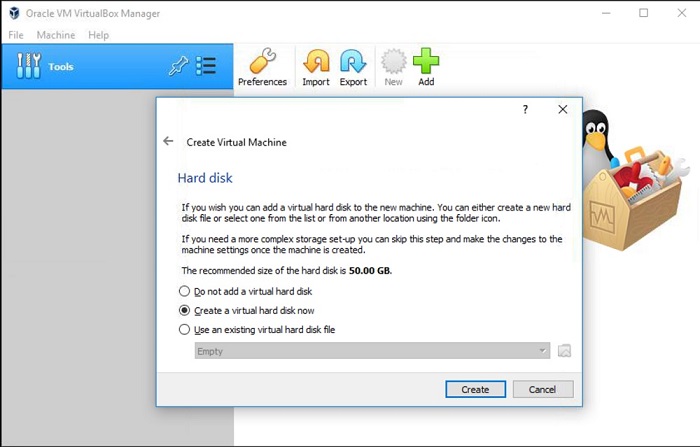
Make sure Create a virtual hard disk now is selected.
Click on Create.
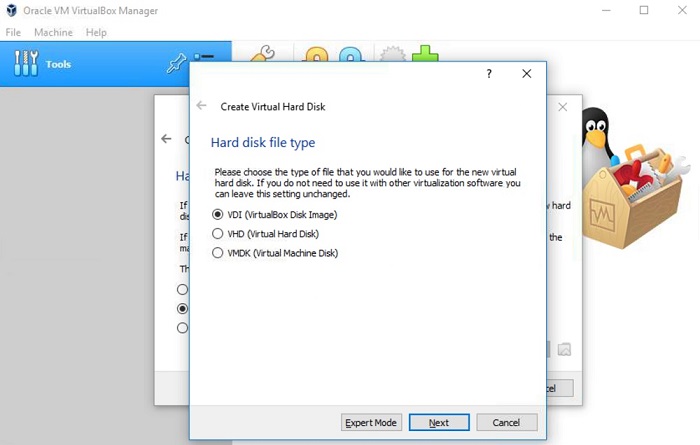
For Hard disk file type you can leave it at VDI for this example. The other options are for compatibility with other VM’s.
Click on Next.
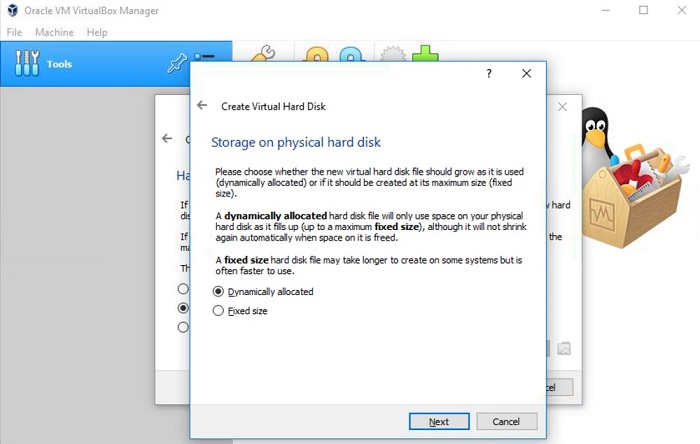
For now choose Dynamically Allocated, unless you have a lot of free hard drive space available. As the dialog indicates, a fixed size can offer some performance benefits, but at the expense that it reserves all the disk space up front.
Choose the option that serves you best and then click on Next.
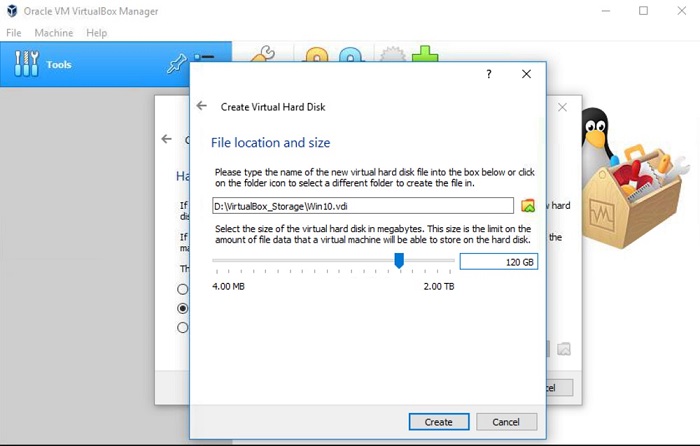
File location and size. This is where your Virtual Machines hard drive will live, I have limited space on the machine I am doing this demonstration on, so I created a folder on an external Hard Drive. I also increased the recommended size from 50GB to 120 GB, so I have plenty of room to work with.
Once done adjusting these settings to meet your needs, click on Create.
This will take you back to the home screen. You now have a Virtual Machine that is the equivalent to a bare metal PC. At this stage it still needs an OS installed to be useful.
Configuring Virtual Machine for Windows Install
Before we can install the OS we need to go into the settings for the VM we just created and review and adjust anything we may have missed or wish to change. We also need to setup the virtual optical drive to point to our Windows 10 ISO image we downloaded earlier.
Making sure the Win10 VM is selected in the left pane, click on Settings near the top.
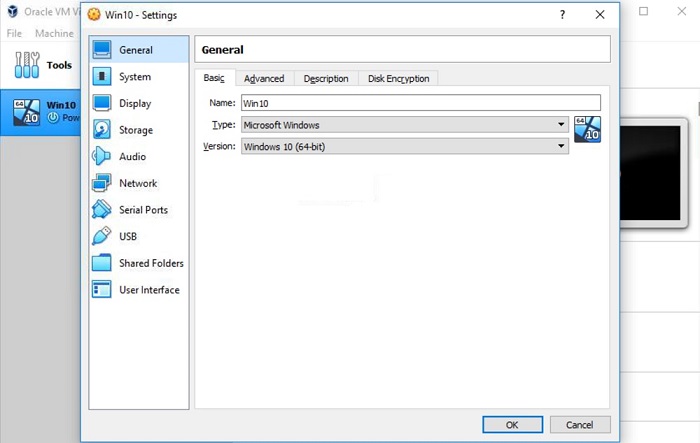
Review the basic settings under general, they should match what you entered earlier.
Click on System in the left pane.
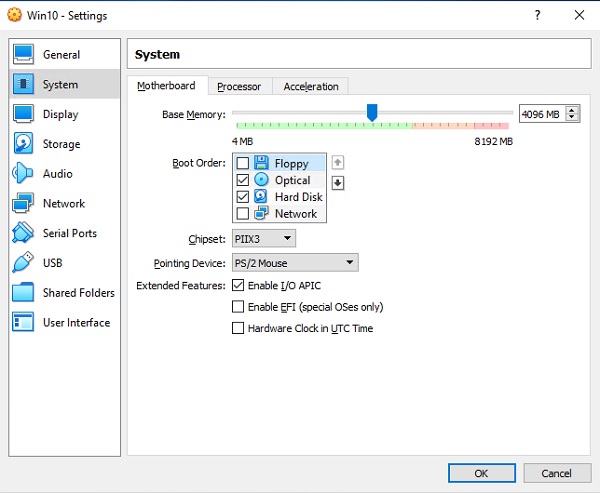
Under the Motherboard tab, verify the memory allocation you configured earlier, you can also change it here if you need to.
In the Boot Order section, I uncheck Floppy from the boot order menu, but leave the Optical and Hard Disk selections checked.
Leave PIIX3 under chipset, and you can choose PS/2 for mouse unless you are using a touch screen.
Also leave Enable I/O APIC checked.
Click on the Processor tab
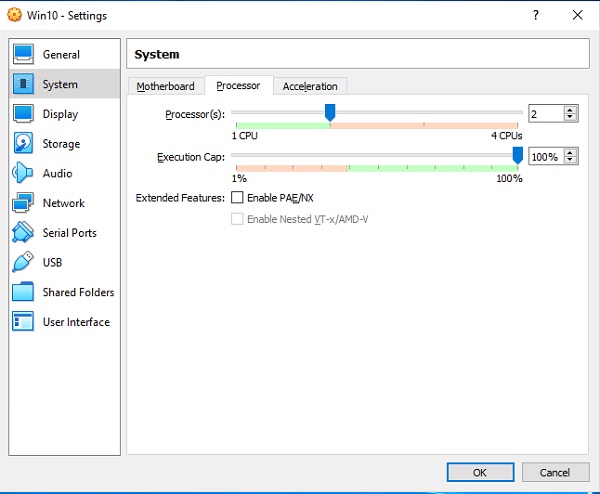
If you have more than one core, you can increase it here. Like with memory I would advise to choose no more than ½ of your actual cores. I usually choose 2 cores on a multi-core (4+ core) host.
You can leave the execution cap at 100% as long as you are not using all of your physical cores. If you for some reason are using a single or dual core host machine, you may want to reduce this a bit just to be sure you always leave a bit of processing power for the actual host.
Leave everything at the default settings on the acceleration tab.
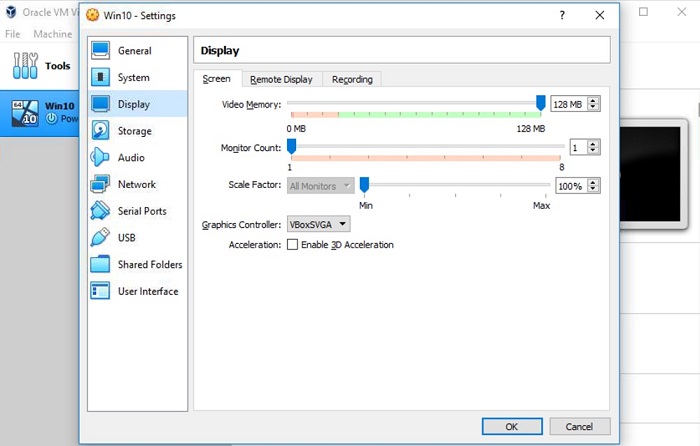
Under Display, ensure that Video Memory is set to 128 MB and VboxSVGA is selected. You can leave 3D acceleration unchecked unless you plan to use it in some way, but most 3D applications don’t work too well in a VM environment.
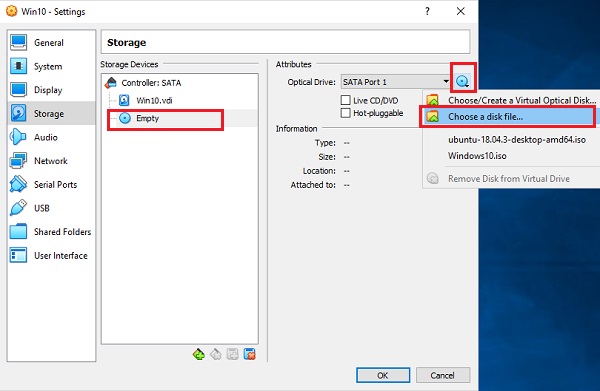
Under Storage we will need to select the image file for the OS you wish to run. This can be Linux or Windows, but since in this guide we are installing Windows, we will use the Windows 10 ISO file we downloaded earlier. This will act as the installation media, the same as if we had a Windows 10 setup DVD inserted within the optical drive.
Click on the DVD icon under Controller SATA, it should say empty at this point. Over in the right half of the window click the disk icon and then choose disk file.
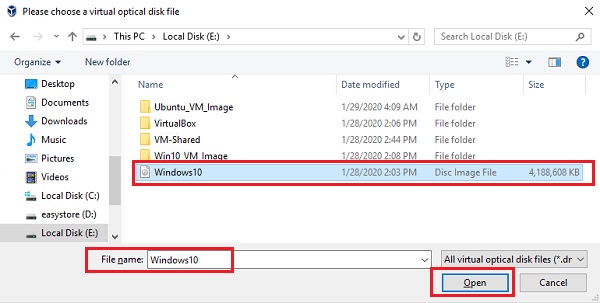
Browse to the Windows 10 ISO image you downloaded earlier. Click on its name to select it and make sure it is entered into the File Name field as shown above, then click on open.
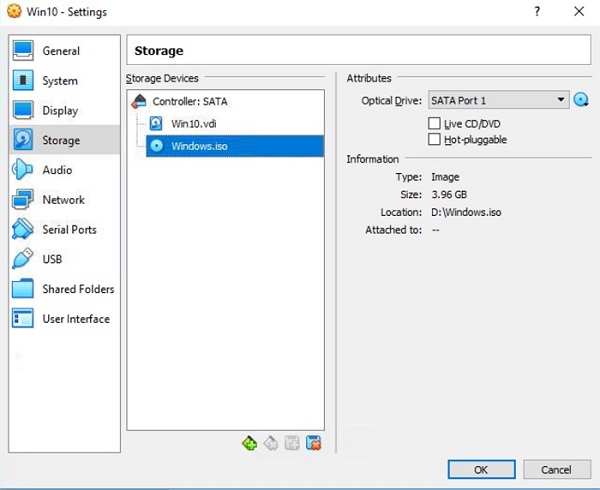
Your screen should now show Windows.iso underneath the Win10.vdi disk, as shown in the image above. Now that we have our installation media configured we are almost ready to begin installing Windows on our VM.
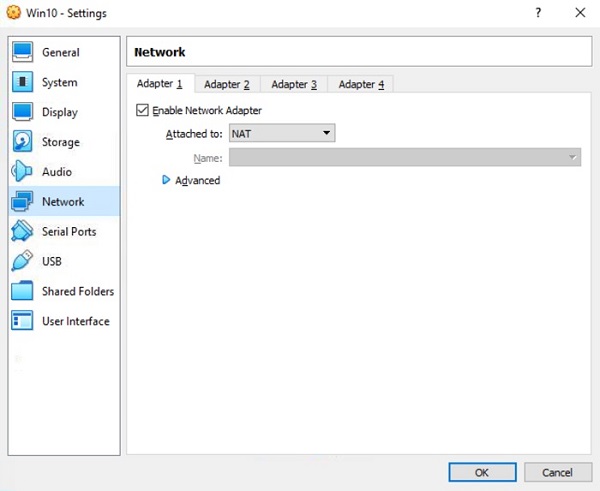
Go down to the Network section just to be sure Enable network adapter and Attached to Nat are both selected.
The rest of the settings should be fine for now. We will look at setting up Shared Folders later on once Windows 10 has been installed on the VM.
You can now click on OK to leave the settings window and save your changes.
Installing Windows 10 on your Virtual Machine
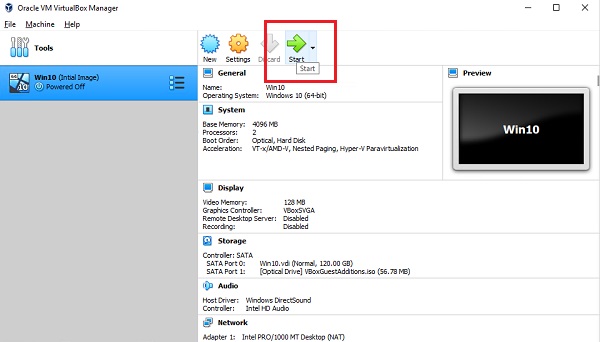
With the settings we made above in place, you can now go ahead and click on start to start the Win10 VM.
If you pointed to the Windows disk image as shown earlier in the guide, your VM should boot and the Windows 10 Setup process should begin.
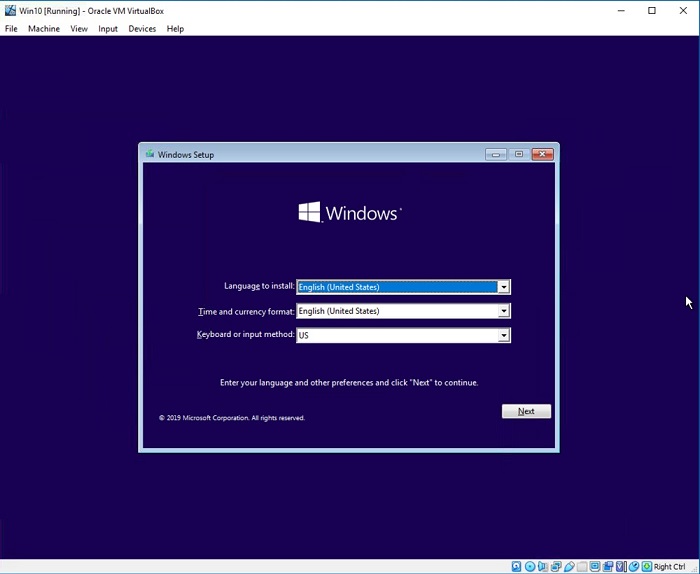
After a little bit, you will be presented with the Windows setup screen as shown above.
Unless you have a need to change these options, you can accept the defaults and click on Next.
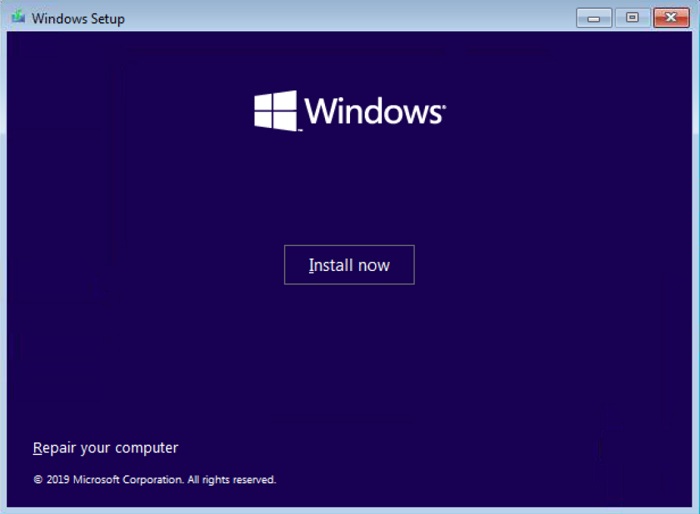
You will then see the Install Now screen, click on Install Now to start the installation.
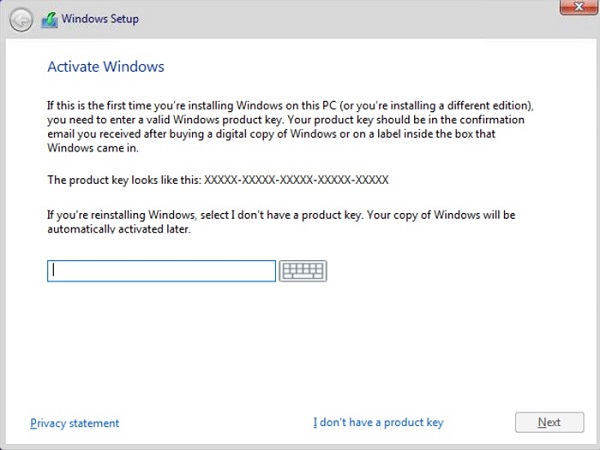
The Setup process will begin. After a short wait you will be prompted for your product key. You can enter it now if you have one, otherwise just click on I don’t have a product key to continue the setup.
You can always add a product key later if you intend this to be a permanent installation, or you can just simply take a snapshot and restore the image once the grace period ends.
Click on Next.
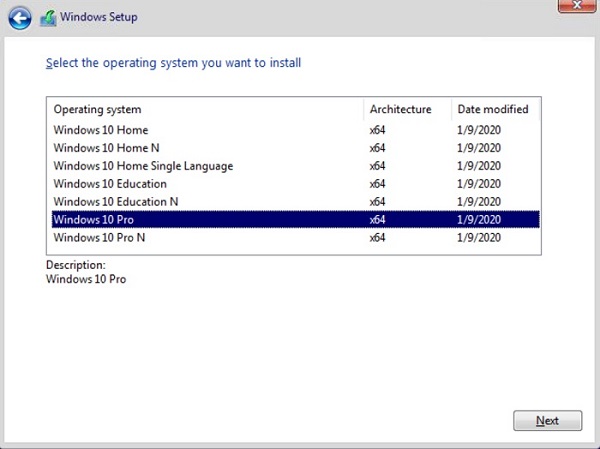
If you choose I don’t have a product key on the previous page Setup will ask which version of Windows you want to install. If you have a key you intend to enter later, choose the version the key is valid for, otherwise choose Windows 10 Pro and click on Next.
If you did enter a product key on the previous step you may not see this dialog at all as the key will determine your correct product version.
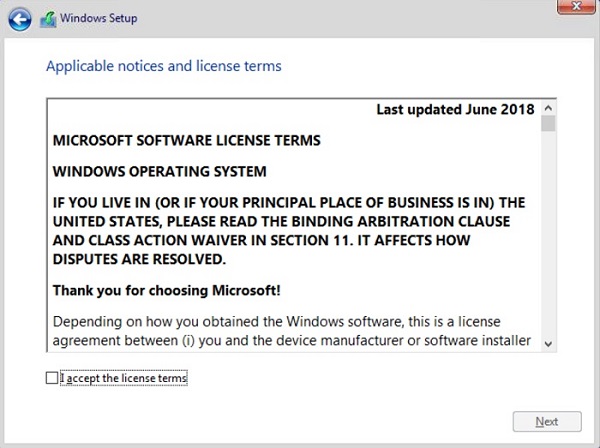
You will then be presented with a license agreement which you must accept in order to continue. Check on the I accept the license terms checkbox and click on Next.
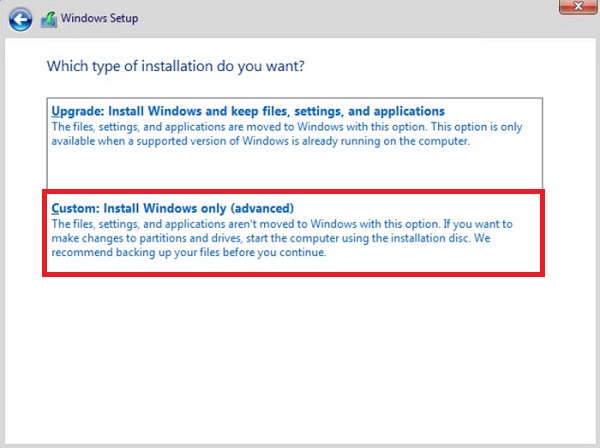
On the which installation do you want, choose the lower Custom: Install Windows only option.
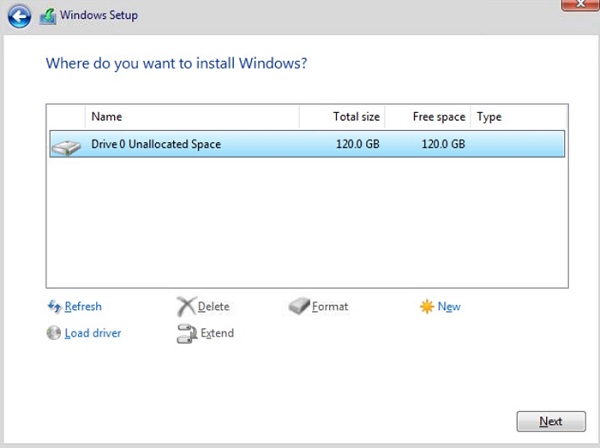
On the next screen you should see the hard drive space you allocated in the VM settings earlier. Verify it is the correct capacity. In my example I set mine to120 GB.
Click on Next.
Setup will begin copying over files and setting up the Windows installation.
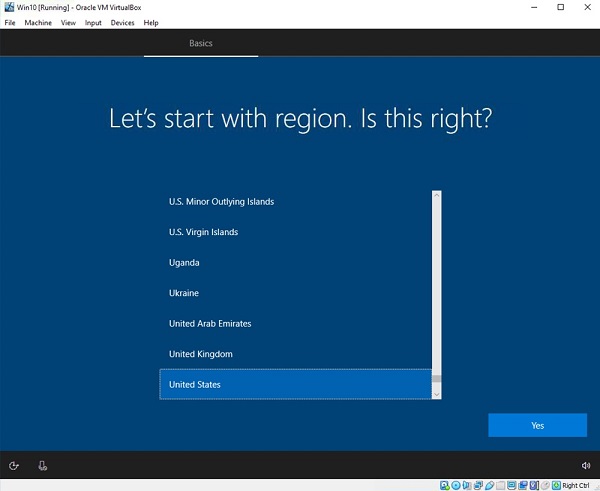
After awhile depending upon the speed of the Hard Disk you choose, on a SSD its only takes a few minutes, on an external drive it can take 15-20 minutes, you will be presented with another series of questions on finalizing the windows setup.
I won’t go through all of them here as they are pretty straightforward and you can usually accept the defaults for most of them. Just pick and choose your preferences as the setup program walks you through the remaining setup.
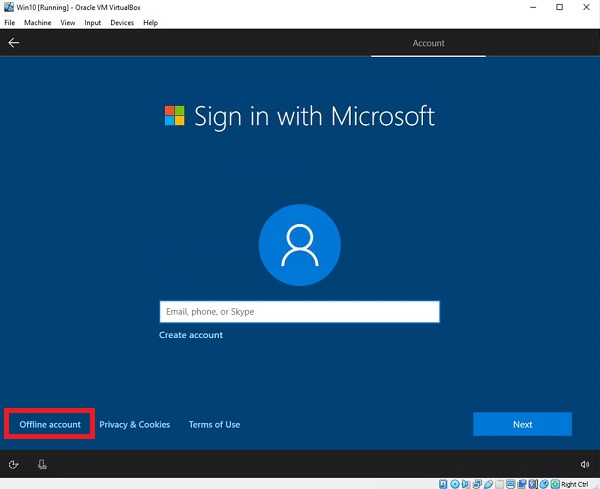
One setting I will cover though is where it asks you to sign-in. For a VM install I usually pick an offline account and use a local username and password.
You need to choose the Offline Account option on the lower left of the screen, and after a few moments Windows asks you again to sign up, you need to choose Limited experience in the lower left.
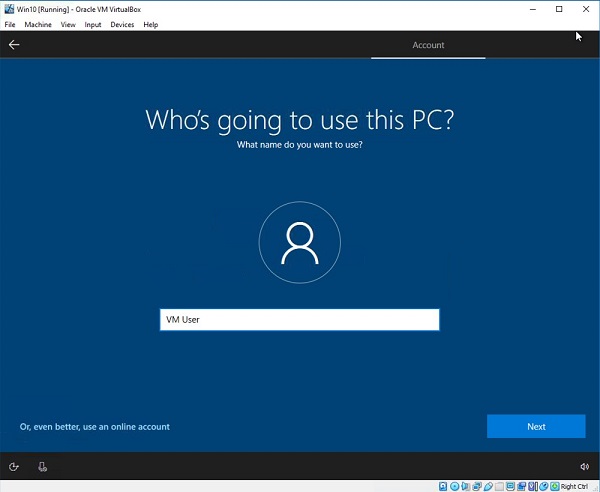
Then you can enter a name, either your own or something generic like VM User depending on how you plan to use the virtual machine. For my example I am just going with the later.
Then you can choose a password.
For this example I am leaving it empty thus there will be no password on my VM Windows account.
Depending on your needs this may or may not be a wise decision. If you plan to use the VM for any sensitive data, of course you will want to secure it with a password just like you would a physical machine.
Then you will be asked some questions on your privacy settings. Choose whichever you prefer. I usually choose no to Cortana since this is a VM and turn off all the other options.
After another few moments of setup you should finally be presented with the Windows desktop. You may want to go ahead and check out the network operation by opening Microsoft Edge and see if you have internet connectivity by browsing to a website.
Assuming everything is ok we can finish up with a few other settings.
The first thing you will probably want to do is change the display settings by right clicking on the guest desktop and choose Display Settings. Choose a resolution that works for you. Note on a 4k host monitor you might have some issues with limited resolution choices until we install guest additions, which is the next step.
Installing Guest Additions
The next thing we want to do is to install the Guest Additions CD.
Guest Additions bring additional functionality to our VM with some of the main features listed below:
- Shared folders: As its name implies, this feature allows you to share folders between the host and the guest systems. You configure VirtualBox to use a specified directory on the host computer to act as a shared folder, and VB will make the directory appear to the guest operating system as it were an network share.
- Better mouse pointer integration: You no longer need to press any key to “free” the cursor from the Guest OS.
- Shared Clipboard: You can share data between the guest and the host operating systems using the clipboard.
- Drag and Drop: You are able to drag and drop files between the host and the guest OS.
- Improved video drivers: The custom video drivers that are installed with Guest Additions provide you with additional high and non-standard video modes, as well as improved video performance. It also allows you to resize the virtual machine’s window. If you have a 4K monitor, these drivers will resolve most tissues you may have had with video scaling.
- Time synchronization: The guest system’s time is synchronized the time with that of the host machine regularly.
For a complete list, refer to the VirtualBox official documentation, available at: https://www.virtualbox.org/manual/ch04.html
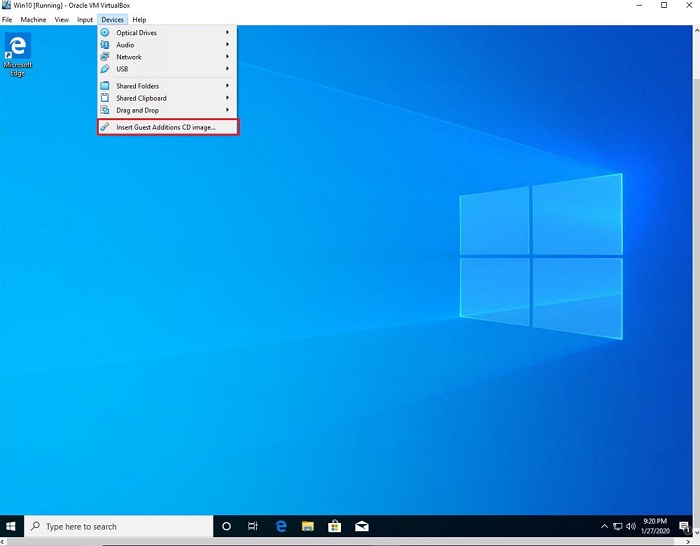
Go up to devices at the top of your VM Window and choose Insert Guest Additions CD.
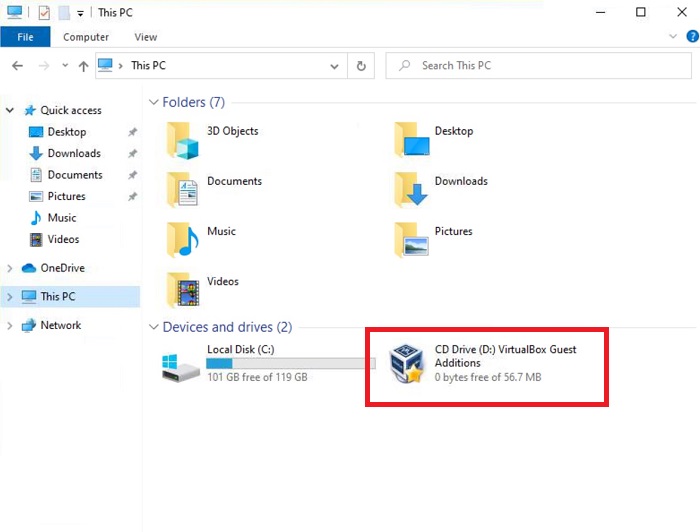
Then in the guest OS (the VM) open up windows explorer, select This PC and you should see you hard disk and a CD drive icon with what looks like a guest additions CD inserted.
Double click on the guest additions CD to open it, and then we will want to install VboxWindowsAdditons by double clicking on the filename.
Click on Yes to allow the program to make changes.
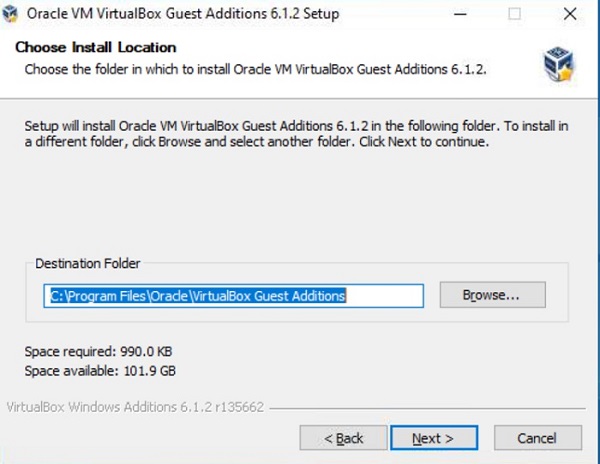
Then click on next to begin the install, on the next screen just accept the default. Do note though that it is referring to the C drive of your guest OS or VM, not your actual host for the file location. The C drive in this case is actually the VM hard disk space we allocated earlier.
Click on Next.
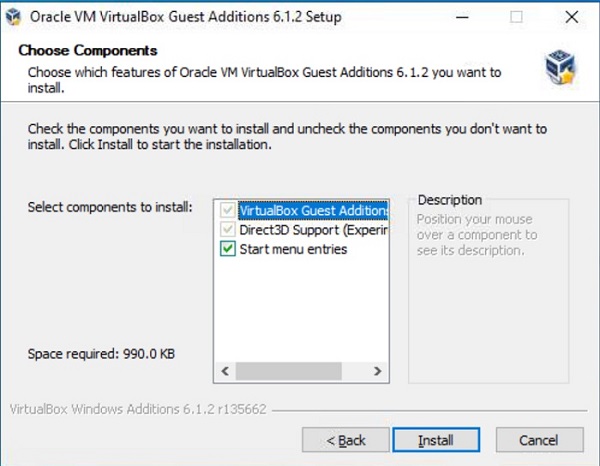
Keep all the defaults and click on Install.
You may get prompted to install a device driver from Oracle, go ahead and click on accept or install.
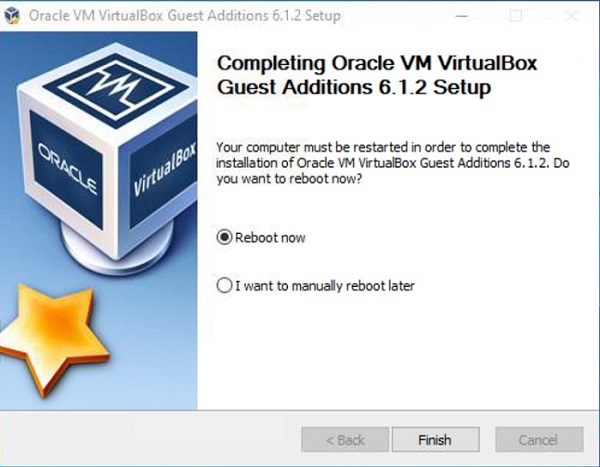
When the process is finished you will be prompted to reboot the VM. Go ahead and do so now by clicking on Finish. This will reboot the VM.
Create a Shared Folder
Now is a good time to setup shared folders. On your host PC, using Windows Explorer create a new shared folder somewhere. I usually do this right off of my C drive or other drive.

In this example I created a new folder called VM_Shared on my D: drive, so in my case D:\VM_Shared.
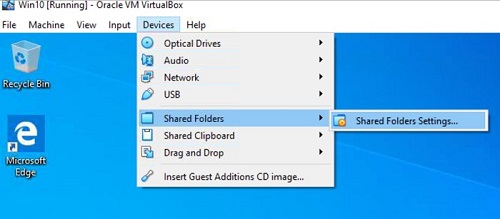
Go to the top menu in the VM window and select Devices, then Shared Folders → Shared Folder Settings.
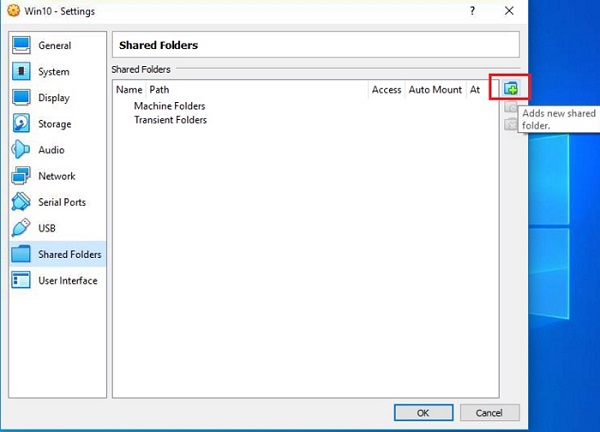
Then in the window that opens click on the little folder with the green + sign off to the right.
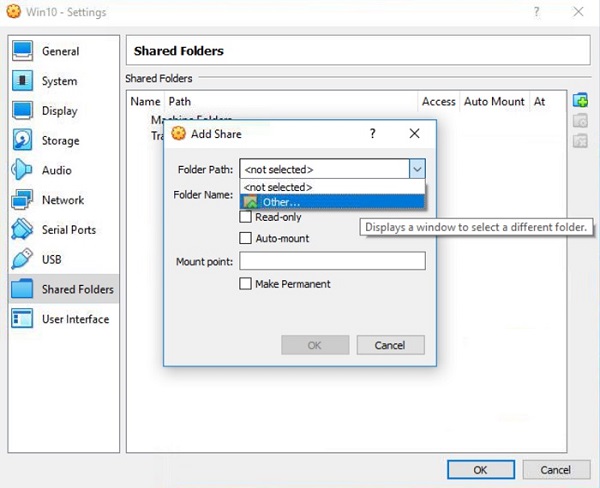
In the Add Share window that opens click on the down arrow by folder path and click on Other.
Browse to the VM_Shared folder you just created. Note that this dialog is actually browsing your host system file structure.
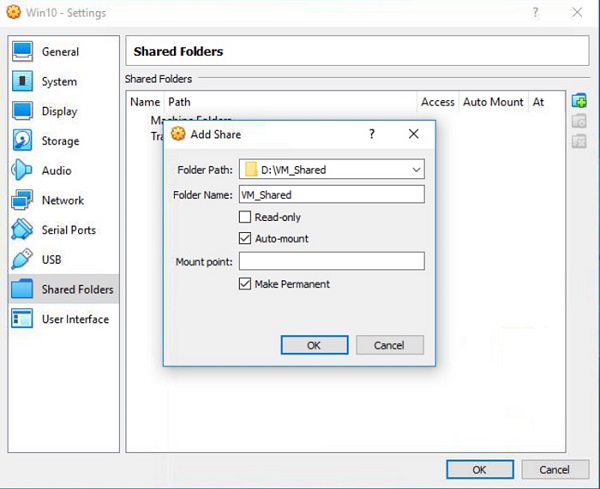
Uncheck Read-only, check Auto-mount and Make Permanent so the shared folder remains intact on successive reboots.
You don’t need to worry about the Mount point as the system will automatically take care of that, by default it maps to “Z”.
Click on OK when finished with these settings, then OK again.
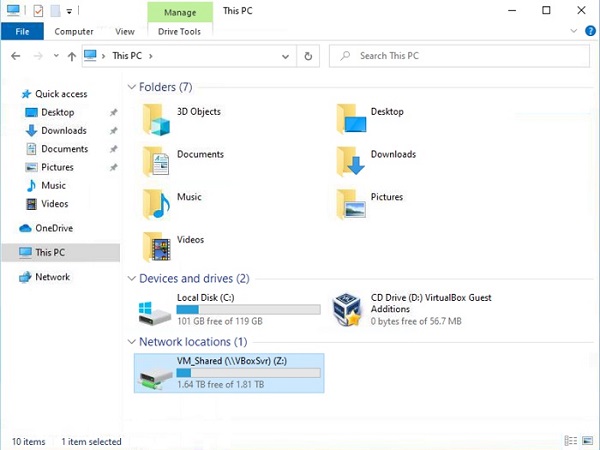
Now if you open up Windows Explorer on the guest OS (the VM) and click on This PC, you should see a new network location VM_Shared or whatever name you chose mapped as a Z drive.
Go ahead and double click on this new share, then right click on an empty area inside the folder and select new text document. Give it a name such as test and hit enter.
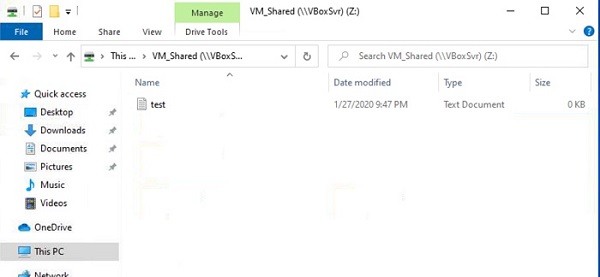
Now on your host system, open up your file explorer and open the VM_Shared folder and you should see your test text document.
If this all is working correctly you should now be setup to easily share files between your host and guest OS.
One precaution, if you intend this VM to be used as a sandbox to test possibly dubious or infected software, I would recommend against using the shared folders feature.
Drag and Drop
When we installed the guest additions package we also have access to another feature similar to shared folders for file sharing, and that is Drag and Drop.
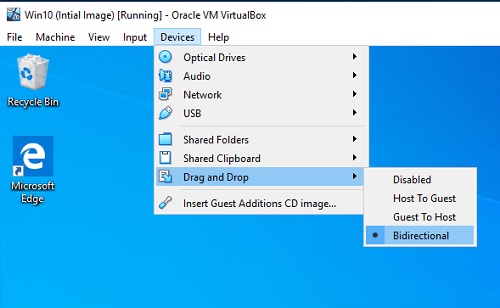
To activate the Drag and Drop feature, go to the VM menu at the top and select Devices -> Drag and Drop. By default this feature is disabled.
You can choose to allow drag and drop to functions in one of three modes.
Host to Guest - Allows dragging of files from host to guest, but not the reverse.
Guest to Host - Allows dragging of files from guest to host, but not the reverse.
Bidirectional - Allows dragging of files from host to guest, or guest to host.
Set it to Bidirectional and you can drag and drop files back and forth easily.
Do be careful with this though, as was the case with shared folders if you intend to use the VM to test potentially dangerous software you may want to keep this feature disabled, or limit it to host to guest mode only.
Another feature is the Shared Clipboard, that you activate and setup the same way as Drag and Drop.
Shared Clipboard, as its name implies, allows the sharing of clipboard data between the guest and host systems. When enabling this feature, keep in mind the warnings as above to keep your host secured.
Create a Initial Snapshot Image
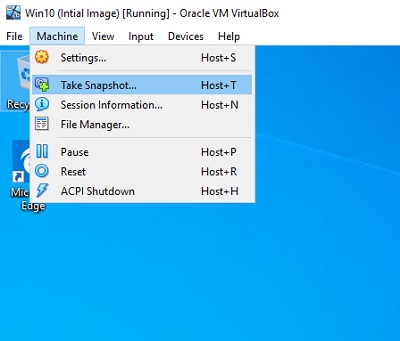
Now at this point, you may want to take an initial snapshot of your installation as a baseline of a fresh install. To do this simply go up to the VM window menu and select Machine → Take Snapshot.
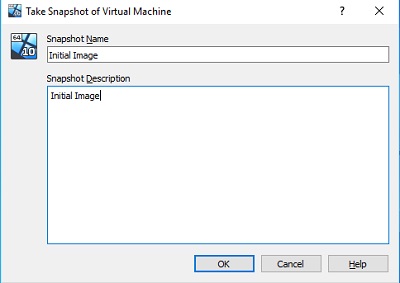
Give it a name and description and click on OK. Now you can restore your VM to the present state if anything happens later on.
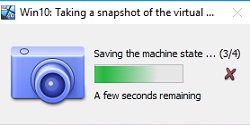
If you plan to install additional software on your VM, you may want to wait and take your snapshot after all your programs are setup and running, or you can even have multiple snapshots at different points, keeping in mind they do each take up some space on your host hard drive.
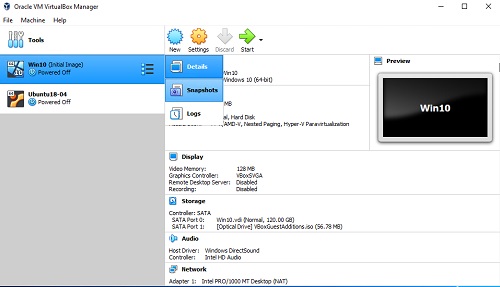
To restore your VM to a previous state using snapshots, the VM needs to be first powered down.
From within the Oracle VM VirtualBox Manager, left click on the 3 line “hamburger” menu to the right of your VM’s name as shown in the image above, and select “Snapshots” to display the snapshots interface.
From within the snapshots interface you should see the snapshot you took previously, along with a entry just below that in a tree like structure showing the current state. Even if you do not make any changes, the current state will always be slightly different as Windows performs processes in the background.
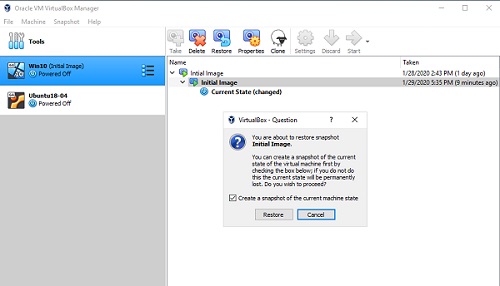
To restore your VM to the previous state of when a snapshot was taken, highlight the snapshot you want and click on Restore, as shown in the image above.
Notice that you will get a dialog indicating what will happen if you continue the restore process, and you are even offered to make another snapshot of the current state of your VM with a checkbox.
To restore, simply click on Restore and your machine will be brought back to the point is was when you took the snapshot.
The selection highlighted in the snapshot interface will change to current state and you can go ahead and click start to return to your VM as it was when you took the snapshot.
