How a C++ program is actually built
If you haven’t already, I highly suggest you start with the Working with the GCC Compiler lesson before moving on to this lesson. Also, some basic familiarity with Using Vim will prove useful.
In most of our programs thus far, we have been doing everything within an Integrated Development Environment (IDE) such as CodeBlocks, and I have often used the statements building and running a program interchangeably with compiling it. Thus, it is easy to think of these meaning the same thing, but in reality they are actually quite different processes.
While compiling is a major component of actually building our C++ files, there is a little more going on behind the scenes than just that one aspect. Building a program encompasses not only compiling, but also other related functions including preprocessing, assembling, and linking.
The build process
The actual build process of turning our raw code contained in the source file(s) into an actual executable program can be broken down into four major steps:
- Preprocessing
- Compilation
- Assembling
- Linking
If you followed along with the last tutorial you should have a simple hello.c file already.
If not here are the required steps again for review:
Type:
C:\Users\Scott\gcc_projects>mkdir hello
C:\Users\Scott\gcc_projects>cd hello
C:\Users\Scott\gcc_projects\hello>vim hello.c
Make a new directory for your program, hello in this case. Type cd hello to change the current directory to hello. Use Vim in the console to create a new file called hello.c.
You should now be in the Vim editor. Press the insert mode key “i” and type the following:
// Simple Hello World program
#include <stdio.h>
int main()
{
    printf("Hello World, remember me?\n");
    return 0;
}
After creating the program as shown above, type :wq to write the file and quit Vim.
We will now compile and build our very simple hello program. We will quickly compile it normally just to make sure there are no errors in our code.
C:\Users\Scott\gcc_projects\example> gcc -Wall hello.c -o hello
If there are no compile errors, (resolve them first if there are) we will compile it again with the extra flag of: –save-temps
C:\Users\Scott\gcc_projects\example> gcc -Wall –save-temps hello.c -o hello
The -save-temps tells gcc to save all the intermediate build files in the current directory along with the executable.
Your directory should now look like this:
C:\Users\Scott\gcc_projects\hello>dir

 Directory of C:\Users\Scott\gcc_projects\hello

12/30/2019  11:45 PM    <DIR>          .
12/30/2019  11:45 PM    <DIR>          ..
12/30/2019  11:27 PM               131 hello.c
12/30/2019  11:28 PM            27,930 hello.exe
12/30/2019  11:28 PM            18,480 hello.i
12/30/2019  11:28 PM               656 hello.o
12/30/2019  11:28 PM               432 hello.s
Notice we now have 3 additional files besides our source (hello.c) and executable (hello.exe). These are hello.i, which is a modified source code file from the preprocessor, hello.s an assembly level code, and hello.o a machine level code which the linker uses.
According to the GNU documentation, “For any given input file, the file name suffix determines what kind of compilation is done:” file.c - C source code that must be preprocessed. (This is our source file as we wrote it, hello.c) file.i - C source code that should not be preprocessed. (This hello.i is from the preprocessor, thus it shouldn’t need to be preprocessed again. Sometimes developers will write optimized source code that they do not want fed into the preprocessor, they can use the .i suffix to prevent this.) file.s - Assembler code. (hello.s is the assembly code version of our hello program.) other - An object file to be fed straight into linking. Any file name with no recognized suffix is treated this way. (hello.o meets this criteria, while not specifically looked for, these files typically use a .o suffix to represent an “object” file.)
We will take a look at the contents inside of these GCC generated files in the sections below.
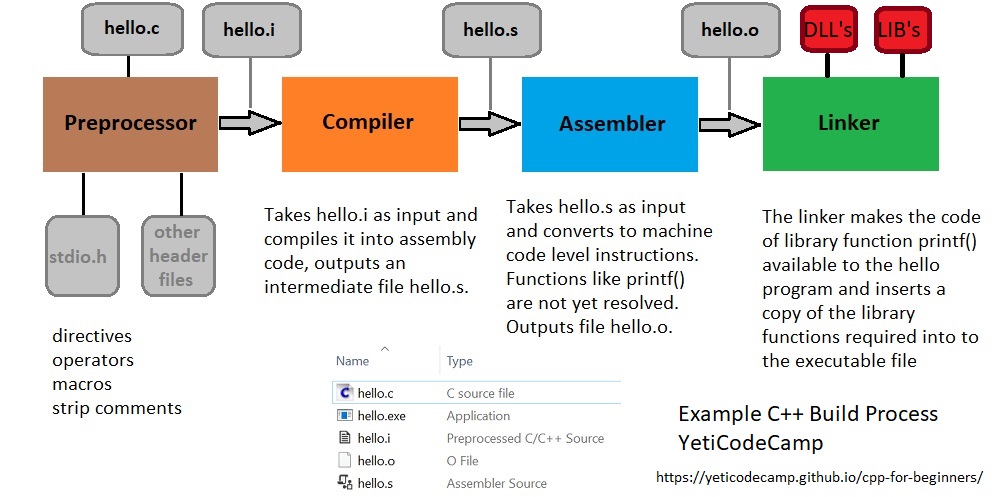
Shown above is a general overview of our simple hello.c program going through the build process. A more detailed discussion of these basic steps follows.
Preprocessing
We have actually been working with what are known as preprocessor directives ever since our first Hello World program.
At the top of every file there was an #include file that started with the prefix ‘#’, as shown here:
#include <iostream>
This statement is called a preprocessor directive. A program known as the preprocessor looks for these statements in order to manipulate the text of the source code file before it is sent on to the compiler.
In the case of the include directive, the preprocessor “includes” the contents of the specified file as though it were actually written at the point where the directive appears. You can think of it as a kind of copy/pasting of the include file’s code into your source file at the location of the include statement.
It is also worth pointing out that the preprocessing directive #include has two variations.
#include <header> is used for system header files and will look for the file in common system directories according to your search path (usually set in the compiler).
#include “header” is used for local header files, from your own programs or others that are not part of standard libraries and not contained within a system directory.
There are several preprocessor directives other than include, just a few of which are shown here:
#define
#pragma
#import
#ifndef
#endif
While pre-processor directives can appear anywhere within a source file, keep in mind that they only take effect from the point of their appearance onward. This is why you will typically see them at the top of our source files, as we want their functionality to be available to all of our code. As mentioned earlier, think of it as copying the include files source code into your program at the point of the include statement.
In addition to preprocessor directives, the preprocessor can utilize preprocessor operators, predefined macros, and if using a Microsoft compiler, Pragmas.
A discussion of the different preprocessor functionality is included toward the end of this guide, but for now it is enough to know of their existence.
Preprocessors also clean up the code by removing comments (replacing them with a single space) and merging continuing lines into one long line by removing the \ and joining the lines. and performs a conditional compilation.
Once the preprocessor finishes all of its tasks, it outputs an intermediate file, in our case hello.i.
If you open up the hello.i file we made above in Vim you can see its contents.
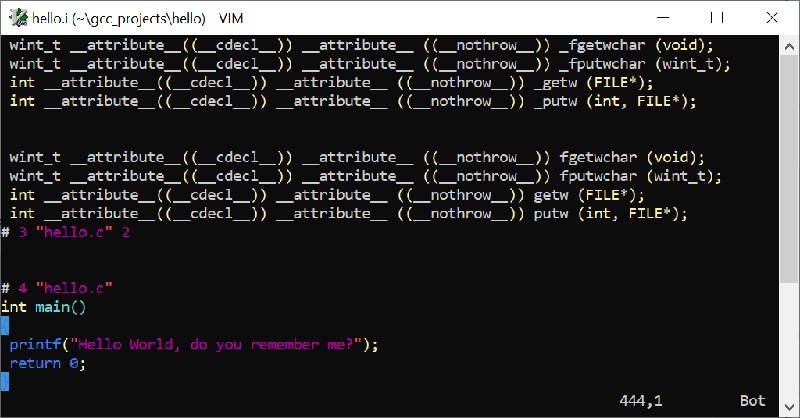
As you can see, there is a lot of added information, mostly from the stdio.h file we included.
In Vim, by pressing G in normal mode you can go to the end of the file, where our code remains basically intact. All of the code above these 5 lines is basically the expanded header files from either stdio.h itself, or code it referenced from other header files.
So now our simple 5 line program is around 440 lines of code. Remembering back to our earliest lessons, you recall me saying this include file is what allows our program to run, and as you now can appreciate, there is a lot of behind the scenes work already done for us.
Compilation
The hello.i file from the preprocessor is now sent to the compiler. The compiler then distills down all the code into what it actually needs to make our program work. Since a lot of functionally is to be provided by external libraries, such as the printf() function, the compiler only needs to provide a stub of these functions for the assembler and linker to associate and include the required code we need later.
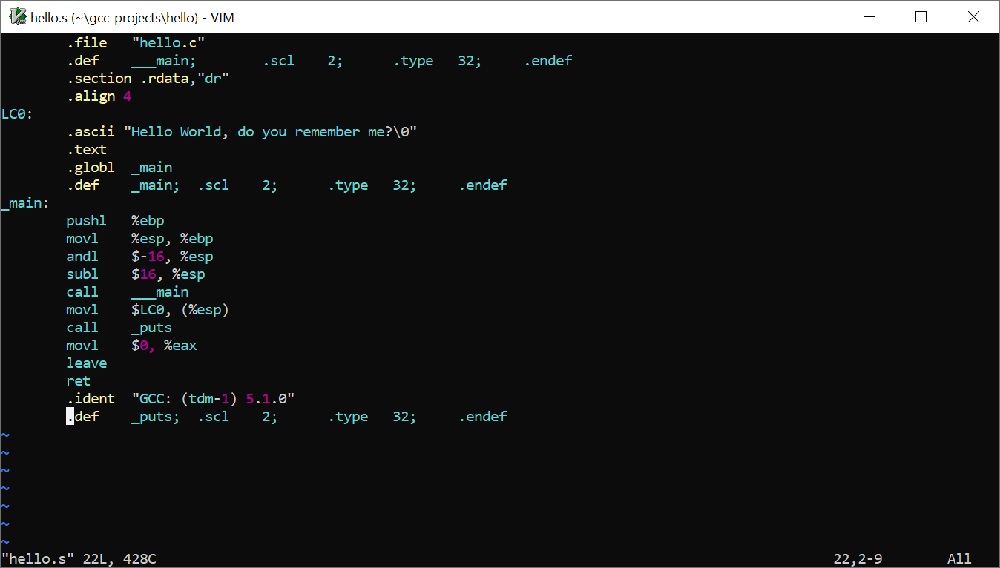
The compiler translates the hello.i file (generated form the preprocessor) to a machine-specific assembly code called an (.s) file. This is an assembly version of our source code, and indeed is called a hello.s source code file in this sense meaning the assembly code source file. In fact, if you were fluent in assembly language, the preceding processing could be skipped and you could code entirely in assembly.
This then is basically the job of the compiler stage of the build process, turning our high-level programming language code, such as C, C++, Java, Python, and so on, into a assembly language version that we can then use to assemble and link our program together.
In addition to the method shown above to save all the intermediate files during the complete build process, we can use the -S option for GCC to produce just the .s file, omitting the assembly and linking steps.:
$ gcc -S hello.c
This command uses the -S flag and only takes the source file as its parameter, as the output will automatically be named the source file’s name with a .s extension instead. This can be useful as of all the intermediate files, this is the one we humans are most easily able to understand without special software tools, especially if you know a little bit about assembly language.
Assembling
Linking
This was a very basic look into the build process of a typical C or C++ program work while using the GCC compiler. For more detailed information consult the GNU documentation.