Using the GCC Compiler
So far we have been using an Integrated Development Environment (IDE) to handle the behind the curtains work of preprocessing, compiling, assembling, and linking of our source code into a useable program.
The CodeBlocks IDE we have been using is bundled with MinGW (Minimalist GNU for Windows), which is a native GCC port for the Win32 (Windows) subsystem. The GCC ("GNU Compiler Collection" also formally known as “GNU C Compiler”) supports C, C++, Fortran and few other programming languages.
In this guide we will go over how we can utilize the GCC compiler directly without relying on an IDE such as CodeBlocks.
You can download and install the GCC compiler on its own, but since we have already been using CodeBocks in many of our tutorials, we already have it installed. Do note though, the GCC version in CodeBlocks is a few versions behind the current release, but it still works well and will meet our needs at this stage of our learning.
Quick Note for Linux users
The first part of this tutorial is written for Windows users. If you are on Linux you most likely have a version of GCC already installed.
You can check by using your terminal and typing: gcc --version
If gcc is not present, you can install the gcc compiler with:
$ sudo apt update
When that process completes type:
$ sudo apt install build-essential
Verify when finished with:
$ gcc --version
If you do see the GCC version information, you can skip to: Our first GCC program.
Setting up GCC on Windows
First, depending upon your IDE you may already be setup to use gcc via the command prompt. To check open up a windows command shell (or console window) by typing **cmd** in the Windows search box and pressing enter.
Note this is also sometimes referred to as the Windows command prompt, terminal, or command line. You can also use the Windows PowerShell if you prefer, type **powershell** in search or alternatively simply right click on your Windows icon and select **Windows PowerShell**.
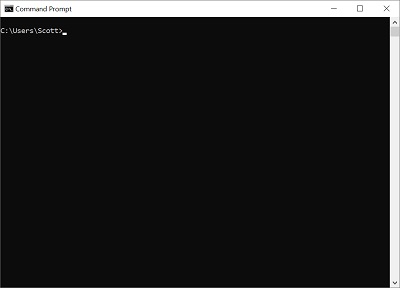
A new black console window should open much like our console windows when we test our programs inside of CodeBlocks.
In the console window type:
C:\Users\Scott>gcc --version
If the gcc compiler is already correctly configured to externally run on your system you should see an output similar to this:
C:\Users\Scott\gcc_projects>gcc --version
gcc (tdm-1) 5.1.0
Copyright (C) 2015 Free Software Foundation, Inc.
This is free software; see the source for copying conditions.  There is NO
warranty; not even for MERCHANTABILITY or FITNESS FOR A PARTICULAR PURPOSE.
If you see gcc version information, as above, you are good and can jump down to the next section.
Our first gcc program
If you get a message saying something to the effect that Windows does not know anything about gcc, then follow the next step(s).
Setting up GCC to run in Windows
One of two things are happening if you do not see the gcc version information from the previous step.
You do not have gcc installed at all on your system, or it’s installed but your path environment variable is not set correctly.
If you do not have CodeBlcoks installed, you will need to download a copy of the MinGW compiler.
Just search Google for “MinGW” or “Minimalist GNU for Windows” and you should find a download link and installation instructions. You can still follow the below steps to set the path if you run into issues, but I believe one of the installation prompts asks if you want the installer to automatically do this.
If you have been using CodeBlocks up until now, and your programs have been compiling and running correctly, we only need to change your system path to include the location of the gcc compiler.
Adding GCC to the Path Variable
To do this, navigate to Control Panel->System and Security->System.
A quick way to do this is to hold down the **Windows** key and press the **pause/break** key. Another way is to right-click on the **This PC** icon found on your desktop or in Windows explorer and select properties.
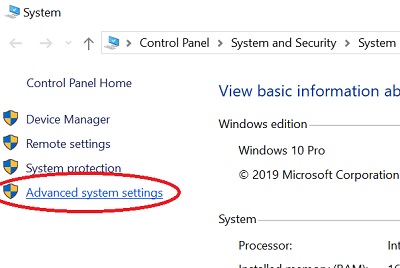
You should now see the window shown above. On the left side of the Control Panel>System and Security>System window, click on **Advanced system settings**.
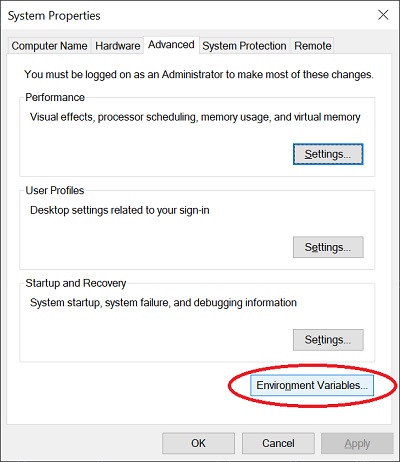
This will bring up a new window **System Properties**, shown above. Now click on the button: **Environment Variables**.
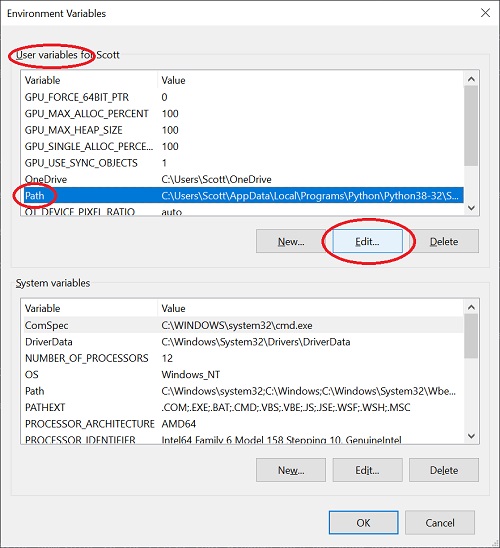
You should now see a window similar to the above. I circled the relevant areas in the image, be sure you are in the **User variables for UserName** section, where username is of course your Windows username, in my case "Scott". Highlight the Path entry as shown in the above image, and click on **Edit**.
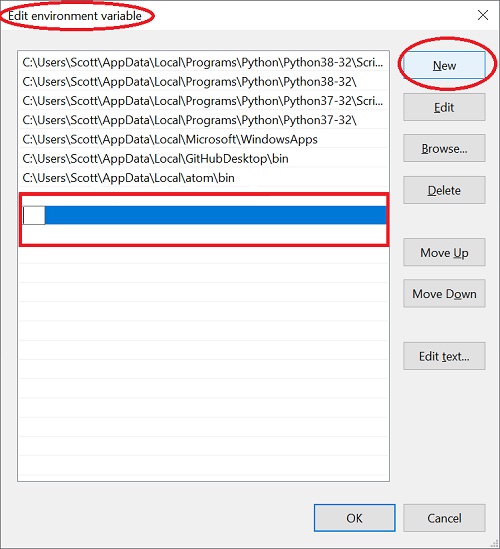
A new window will appear and should be similar to the above image. Again, I circled the relevant areas, first be sure you are in Edit environment variables as shown in the window title, then click on the **New** button.
-
First open up Windows explorer and navigate to where your CodeBlocks installation is setup. If you chose the default settings when installing CodeBlcoks, it should be at C:\Program Files (x86)\CodeBlocks
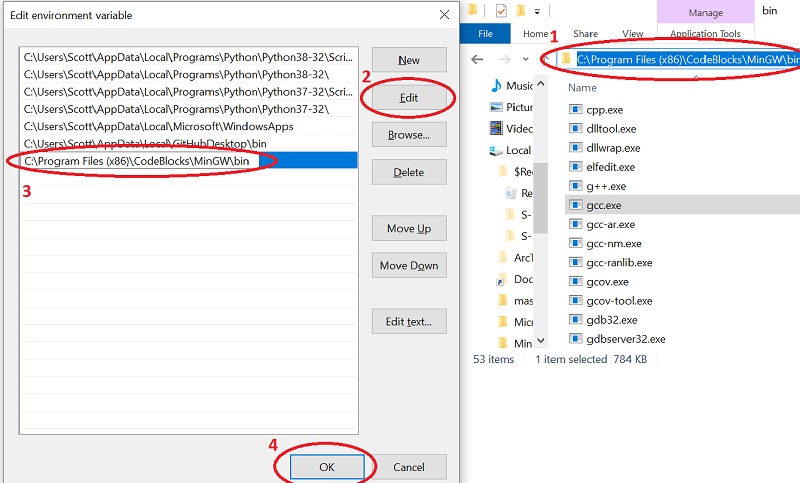
In this folder open up the subfolder MinGW, then inside MinGW open up the bin folder. In bin, you should see a bunch of files, with one of them being gcc.exe. Now if you click in the file location portion of the explorer window just to the right of bin, as circled and indicated by the number 1 in the above image, it will collapse the file location down and you can right click on it and select copy.
-
Now go back to the open Edit environment variable window and click on edit, as shown in circled area 2 above. A new line will appear in the left pane, right click here and select paste. If everything went ok, you should see the location of your CodeBlock’s install, along with the subfolders MinGW and bin in the file path string as shown in circled area 3 above.
-
It should be similar to mine, or at C:\Program Files (x86)\CodeBlocks\MinGW\bin if you chose the default install. You can also just type the file path in manually if you know it, just be careful of spelling or syntax errors.
-
With the new path location entered, you can go ahead and click OK, as shown in circled area 4 above.
You should now see the new path for the gcc compiler location. you can go ahead and Ok out of any open Windows to save the changes.
Now go back and open up a new console window by typing **cmd** in the search box and pressing enter. Close any old console windows as they will have the old path information still in their cache.
In the new console window type:
C:\Users\Scott>gcc --version
If the path is set correctly, you should now see the version information as shown below.
C:\Users\Scott\gcc_projects>gcc --version
gcc (tdm-1) 5.1.0
Copyright (C) 2015 Free Software Foundation, Inc.
This is free software; see the source for copying conditions.  There is NO
warranty; not even for MERCHANTABILITY or FITNESS FOR A PARTICULAR PURPOSE.
If not, double check the above steps. If everything still looks ok, reboot your PC before giving up, sometimes this can clear up any issues.
One final note and warning as I know I will be asked, especially since this is a tutorial for programmers. While it is possible, and actually quite easy to adjust the PATH environment variable via the command line using setx, I do not recommend this way for new users as you could end up breaking much of your system functionality.
Actually, I really don't recommend the setx method to adjust the PATH environment variable in general, as I feel this is one of the few exceptions where having the GUI interface handle it as being the safest option, mainly because you could easily delete or corrupt your PATH and encounter all sorts of trouble.
If you do insist on this route, at least backup your path before messing with it using something like:
PATH >> system_path_bak.txt
Our First GCC Program
For this next part you should create a new project folder just to keep your code separate from everything else we have been doing up to this point in our tutorials. You can make a sub directory in your other C++ project's folder if you wish.
In this demonstration I am going to make a subdirectory inside my C:\Users\Scott\ folder, or within my home directory. In Windows this is typically C:\Users\"username"\ and is the default directory the command shell starts in.
Note, for the purposes of this tutorial I will often use the terms command shell and console interchangeably, but you can also substitute these terms with Windows PowerShell if you prefer working with it instead.
You can either use windows explorer, or make a new directory within the console by typing mkdir (or md) and the new folders name.
C:\Users\Scott> mkdir gcc_projects
This will create a new folder gcc_projects within your home directory. You can confirm it by typing **dir** in the console or checking with Windows explorer.
Note that for the rest of this tutorial I will be using the console to do directory operations and I would recommend you become comfortable with these methods as well as we progress in our programming knowledge.
Now let's change our working directory with the cd (change directory) command, by typing cd gcc_projects into the console.
cd gcc_projects
Note that you can also utilize autocomplete by typing **cd gcc** the hit the **tab** key. While for this example it won't make a big difference, for longer file paths it can be useful.
We will use gcc_projects as our "root" folder, so for this first demo let's make a new subdirectory called "example" to make our first program.
C:\Users\Scott\gcc_projects> mkdir example
Now if we type in dir into our console window we should see:
C:\Users\Scott\gcc_projects>dir

 Directory of C:\Users\Scott\gcc_projects

12/30/2019  05:57 AM    <DIR>          .
12/30/2019  05:57 AM    <DIR>          ..
12/30/2019  05:56 AM    <DIR>          example
               0 File(s)              0 bytes
               3 Dir(s)  224,195,375,104 bytes free

C:\Users\Scott\gcc_projects>
Change into our new directory:
C:\Users\Scott\gcc_projects>cd example
Now we will want to create a new file for our source code, I am going to call mine "hello.c". Note this will be written in C language, so I am using use the .c suffix.
We can create our C source file in one of two ways.
I am going to be using a program call Vim. It is a UNIX style text editor and makes working with files in the command line easier, but it does have somewhat of a learning curve to it. Since you are an aspiring programmer I would recommend learning it. Vim can be downloaded here: Vim for Windows.
If you are on Linux in your terminal: sudo apt install vim
I have a separate tutorial page on using Vim here Using Vim.
You can also use notepad if you refuse to use Vim, but it is a bit clunky, you can do this with:
C:\Users\Scott>notepad hello.c
You will be prompted that the file does not exist, do you want to create it click yes. Also when saving in notepad be sure it doesn't change your extension to .txt, when you save. In this example we will want our file saved with the .c extension. There are also other text editors you could use, but I will not cover any of them.
From here on I will be using Vim for text editing. I will be assuming you followed my Using Vim guide and have installed Vim and at least know the most basic commands.
Type:
C:\Users\Scott\gcc_projects\example>vim hello.c
You should now be in the Vim editor. Press the insert mode key “i” and type the following:
// Simple Hello World program in C language
#include <stdio.h>
int main()
{
    printf("Hello World, remember me?\n");
    return 0;
}
Be sure to include a newline after the closing bracket by pressing return. Exit insert mode by pressing the **esc** key and save the file and quit vim by typing **:wq** (for write (or save) file and quit) and pressing enter.
Now back in the console type:
C:\Users\Scott\gcc_projects\example> dir
and press enter. You should now see your new file “hello.c” listed.
Now we will compile our source code with the gcc compiler.
In the console type:
C:\Users\Scott\gcc_projects\example> gcc -Wall hello.c -o hello
and hit enter. If all goes well after a couple of seconds the prompt should return.
If all does not go well, you should see some error message to help point you in the right direction.
A quick explanation of the command:
gcc -Wall hello.c -o hello
- “gcc” calls the gcc.exe executable.
- “-Wall” enables the printing of most warnings (helpful for beginner programmers to catch errors in code).
- “hello.c” is of course our source file we just created above.
- “-o” tells the gcc compiler we want to specify the output name, in this case “hello”. If we do not specify the output file name then an output file with the name a.out is generated by default.
Now type dir into the console and you should now also see a hello.exe file that was generated by our compiler.
C:\Users\Scott\gcc_projects\example>dir

 Directory of C:\Users\Scott\gcc_projects\example

12/30/2019  12:00 PM    <DIR>          .
12/30/2019  12:00 PM    <DIR>          ..
12/30/2019  12:00 PM             1,034 .hello.c.un~
12/30/2019  12:00 PM               199 hello.c
12/30/2019  06:41 AM               199 hello.c~
12/30/2019  06:58 AM            27,930 hello.exe
               4 File(s)         29,362 bytes
               2 Dir(s)  224,349,650,944 bytes free

C:\Users\Scott\gcc_projects\example>
We can run it by simply typing its name in the console:
C:\Users\Scott\gcc_projects\example>hello
The result of 10 + 15 is: 25
C:\Users\Scott\gcc_projects\example>
If you are on Linux run it by typing ./hello in the terminal.
Congratulations, you created your first program using gcc without the aid of an IDE.
You can do much the same as above using a C++ source file with just a few modifications:
Type:
C:\Users\Scott\gcc_projects\example>vim hello2.cpp
You should now be in the Vim editor. Press the insert mode key “i” and type the following:
// Simple Hello World program in C++ language
#include <iostream>
int main()
{
    std::cout << "Hello World, remember me?\n";
    return 0;
}
Again, press "Esc", then type :wq to write and quit.
To compile, from the console:
C:\Users\Scott\gcc_projects\example> g++ -Wall hello2.cpp -o hello2
Now we can move on to the next lesson learning about the build process.